I am absolutely thrilled with the styling and fit of these cargo pants!
Throughout the last 3 years of my sewing journey I have tried to sew pants and to be honest it has not been my most successful item of clothing to sew. Finding the proper fit has been difficult but I am thrilled to announce that has now changed!! The onset of high rise pants in fashion several years ago is actually what prompted me to start sewing. What I didn’t realize at the time is that pants are notoriously one of the more difficult garments to sew. So I was faced with two problems- finding a pattern that would work for me AND figuring out how the heck to sew pants that would fit well.
These Cargo pants from Wardrobe by Me Patterns are the perfect choice as far as styling goes. They have a low rise! The waistline is just below the belly button which is exactly what I need. Although I am 6 feet tall, I am extremely short-waisted and feel most comfortable when I can wear pants on my hips. A lower rise pattern is incredibly helpful because the waistband is designed to do just that. I wouldn’t be faced with making significant changes to the height of the rise making it less complicated to choose a size.
Cargo pants are definitely a fashion trend this year. The Wardrobe By Me Cargo pant pattern, with its wide baggy legs and large patch pockets is a perfect pattern choice for recreating this in vogue look. I have styled my cargo pants with the Pika Vest; for all the details about this make cli.
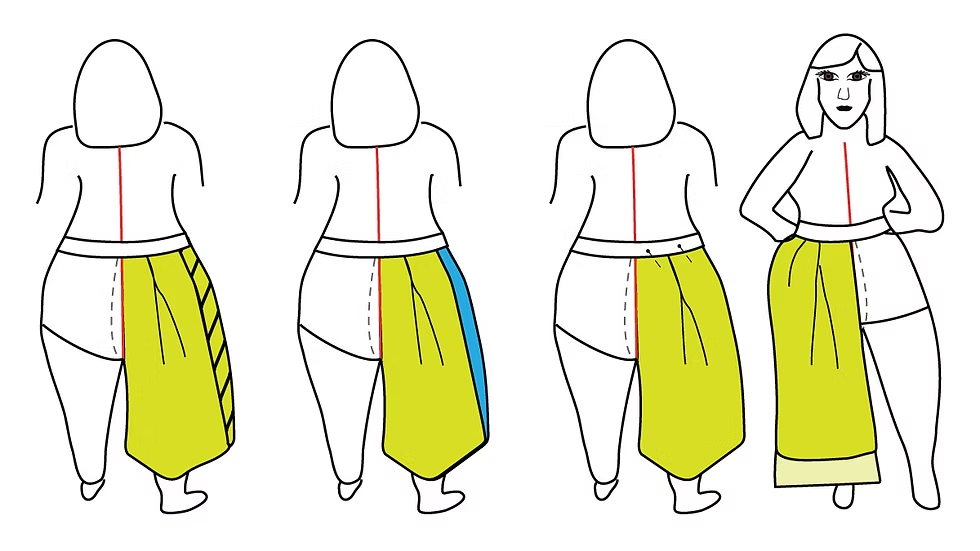
I had noticed on Instagram that many sewists were referring to a method called “Top Down Center Out” for sewing pants and celebrating the fit they were achieving. So I started to research the method and was immediately drawn into this interesting fit concept.
This fitting concept was developed by Ruth Collins @ithacamaven on Instagram. Ruth posts all of the details about the “Top Down Centre Out“ method on her account, including updates about this method as she refines it. It is a beginner friendly, body neutral approach using hip and waist measurements and 5 easy steps to get a perfect fit for you! Top Down Center Out is a pants fitting method that caters to the body curves and people’s fit preferences. It has changed my life!
Threads magazine first published Ruth’s method in their #218 issue (click here for the link to the article). Stacey of @thecrookedhem has published a series of videos on her YouTube channel are incredibly helpful. She takes you through each of the 5 steps involved in the method.
The basic premise of the Top Down Center Out is that you cut out your pattern based on both your hip and waist measurements. You begin by creating a muslin of your pattern starting with a mock waistband. Once you have decided on your size you cut out the pattern extending the perimeter of your seam allowance to add extra fabric to make it easier to make adjustments to your muslin. You begin by creating a “half-pant” toile based on accurate cutting, raking and sewing. Once you have prop fit adjustments you add the waistband. You transfer these adjustments back to your paper pattern and to cut out your fashion fabric with confidence. You then can make final, minor adjustments to your fabric and voila- you have pants that fit!!
For my cargo pants I adapted the Top Down Center Out method because of the faced waistband. To begin with a created a toile for cargo shorts. As there is not a separate waistband to construct I worked with my hip and waist measurements. My waist is only slightly smaller than my hip measurement so I cut out the crotch/inseam size based on my hip measurement and the side seam based on my waist. I graded the side seam down to the hip measurement beginning a few inches below the waistband. I completed my toile making minor fitting adjustments to the darts and the back seam. I also made a flat seat adjustment, decreasing the curve on the pants. I did this relatively easily by pinning and cutting back the extra fabric in the seat, reducing the curve of the back crotch seam.
I was so thrilled with results of the toile that I went quickly unpicked the basting stitches and went back to add my patch pockets and finish the shorts properly. They will be a great addition to my travel wardrobe stay tuned for traveling posts on my Instagram feed.
Now I was ready to sew my linen cargo pants. They sewed up quickly and it was a wonderful stress-free project because I knew they would fit! I choose the same coco coloured linen that I used to create my Canvas jacket also from Wardrobe By Me patterns. I knew they would allow me to mix and match pieces for my travel wardrobe and worn together they make a wonderful casual linen suit.
I added 3 inches to the length of the pants for my usual finished inseam measurement, then added an additional 4 inches allowing for enough fabric to create a 2 inch cuff. To allow for different styling options I unpicked the outside seam of the cuff and threaded some brown ribbon through the cuff. This allows me to style the pants in several different ways. I can wear them as full length pants, cuffed ankle length pants or with a gathered cuff that features a bow! If your hemline is wide enough you can easily add a ribbon to any ready to wear cuff to achieve this look as well.
The topstitched large patch pockets on the front and back of the pants add interest and versatility to these pants. I love the pleated detailing on the back pockets and adding the side leg pocket was a fun option. I chose to add snaps on the pocket flaps instead of buttons, in-keeping with a more traditional safari pant look.
I can’t say enough about this pattern and options available to you as far as creative design and fabric choices. This pattern is perfect for sewing with twill, denim or parachute fabric.
I would really like to make a pair out of a heavy satin fabric and I definitely see a denim pair in my future. For winter…. imagine them in a gorgeous heavy cord.
After all.. There is Sew Much To Design.
Happy Top Down Center Out Cargo Pant Sewing,
Lou Sheffer
Yorumlar